The Ultimate Apex Legends Controller Settings Guide Season 17
Apex Legends offers tailored controller settings for optimal movement and aiming. Discover settings that align with your playstyle to enhance skills.
14.5K+
Subscribers
250K+
Followers
24.9K+
Followers
Apex Legends Controller Settings Guide
While controller settings often come down to individual preference, there are certain configurations that many professional players swear by to gain a competitive edge. Below are some of the most recommended controller settings for Apex Legends.
Recommended Apex Legends Controller Settings
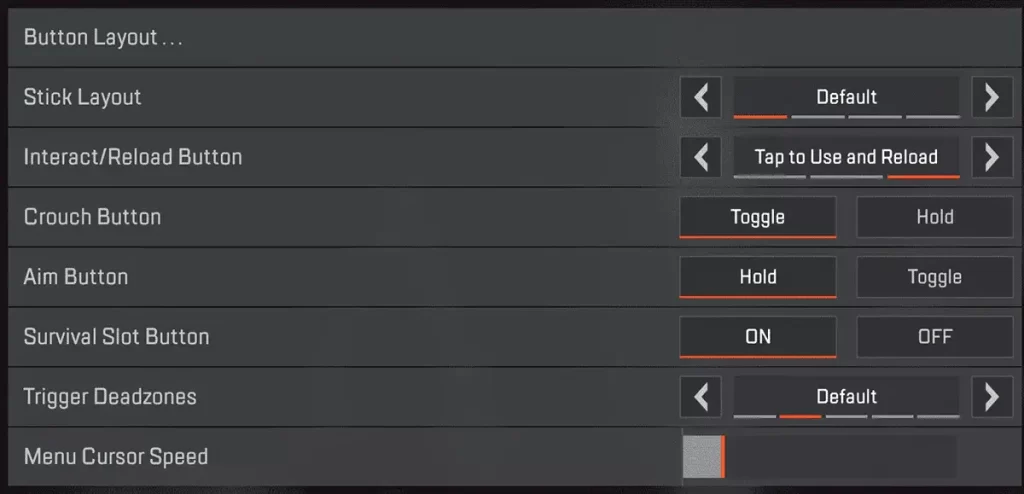
Button Layout: Button Puncher
The button Puncher layout switches the Melee and Crouch controls, allowing players to slide or change their stance without removing their thumb from the right stick. Since movement is a critical aspect of Apex, this layout enables you to execute advanced techniques while maintaining optimal aim.
Stick Layout
Set this to Default
Interact/Reload Button
Tap to Use, and Reload option offers the fastest way to loot and reload. If you’re faced with an interaction prompt needing to reload, a simple tap will reload your weapon, while holding down the interact button will execute other actions like reviving teammates.
Crouch Button
I suggest using the “Toggle” option for the Crouch Button setting to make aiming while crouching more convenient. However, some players prefer the “Hold” option for crouching, as it allows them to crouch during battles rapidly—a tactic that can be highly effective in Apex Legends.
Aim Button
Set this to Hold
Survival Slot Button
Your choice for the Survival Slot Button setting will depend on your gameplay preferences. Enabling allows quick access to survival items like heat shields via a D-Pad press. If you find yourself frequently distracted by inspecting heirloom items, it might be best to disable this setting.
Trigger Deadzones
The trigger dead zone setting adjusts the sensitivity of your trigger pulls. The “Default” option is generally the best for most players and controllers. I advise against increasing the dead zone unless you’re experiencing issues with your controller.
Apex Legends Movement / Aiming Controller Settings
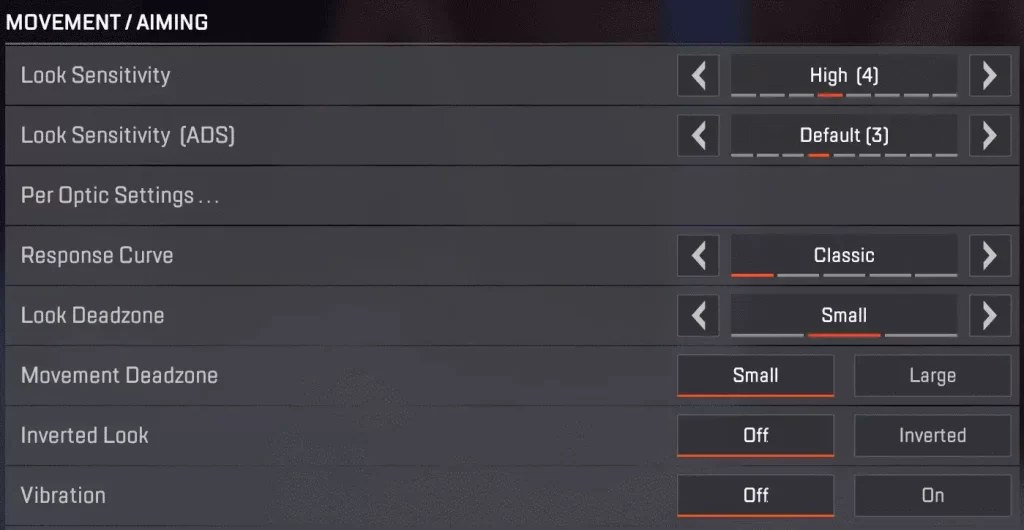
Look Sensitivity
Look Sensitivity settings are crucial for aiming and target tracking. In my opinion, the best option is to set it to “High (4).”
Look Sensitivity (ADS)
ADS Sensitivity set to “Default (3)” is generally effective for most players.
Per Optic ADS Sensitivity
Apex Legends offers the option to fine-tune your ADS sensitivity according to your specific optic. While I recommend keeping this feature OFF for consistency across all optics, you’re welcome to adjust these settings if you feel you could benefit from individual tuning.
Response Curve
A classic response curve is often considered the best option because it offers a balanced approach to aiming and movement. It employs an S-curve mapping for the stick input, meaning your character’s aim and movement speed will increase progressively as you move the stick from its neutral position.
Look Deadzone
The Look Dead Zone settings control the distance the controller stick must move from its neutral position before the game registers an input. These settings are primarily designed to counteract stick drift issues. For most controllers, setting set this to ‘Small’.
Movement Deadzone
As Look Dead Zone these settings are primarily designed to counteract stick drift issues. For most controllers, setting set this to ‘Small’.
Inverted Look
For the Inverted Look controller setting, keep it to ‘Off’ unless you’re accustomed to inverted controls.
Vibration
Many professional Apex Legends players prefer to turn off controller vibration to enhance their aiming accuracy.
Advanced Look Control ALC Controller Settings
Advanced Look Controls (ALC controller settings) in Apex Legends offer a higher level of customisation for players who want to fine-tune their aiming and movement mechanics. While I can provide some general guidelines, it’s important to note that ALC settings are highly personal.
Experiment with Apex Legends ALC
Experimenting with ALC allows you to adjust various parameters, such as stick sensitivity, dead zones, and response curves, to better suit your personal preferences. You can test different controller settings in training or casual matches to find the combination that is most effective.
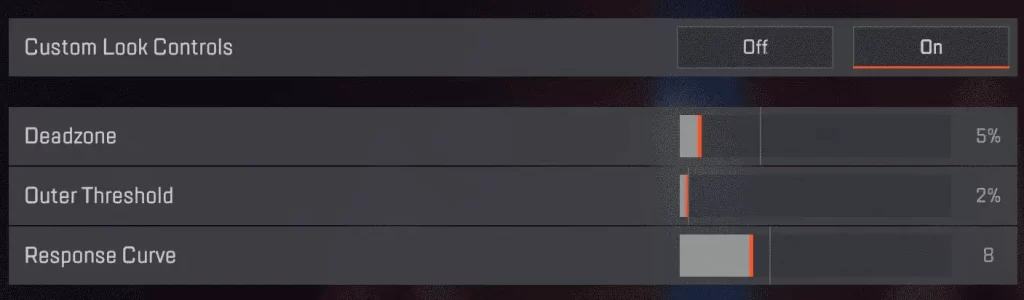
Apex Legends Custom Look Controller Settings
Deadzone: 5%
Deadzone setting is crucial for eliminating stick drift, which can be a nuisance during gameplay. Start with a 0% deadzone and gradually increase it in 1% increments until you notice that stick drift is eliminated. This ensures that you’re using the smallest deadzone possible.
Outer Threshold: 2%
Outer Threshold setting is another important parameter. It creates a buffer zone at the outer limits of the controller stick’s range where no input is registered. A low setting of 1-2% for most controllers should suffice. This ensures that you’re making full use of the stick’s range.
Response Curve: 8
Response Curve setting is pivotal for determining how your controller stick responds to your movements. A value of 0 will produce a dynamic curve similar to the Classic, offering a balance between crisp and finely tuned aiming. On the other hand, a max value will result in a linear response curve.
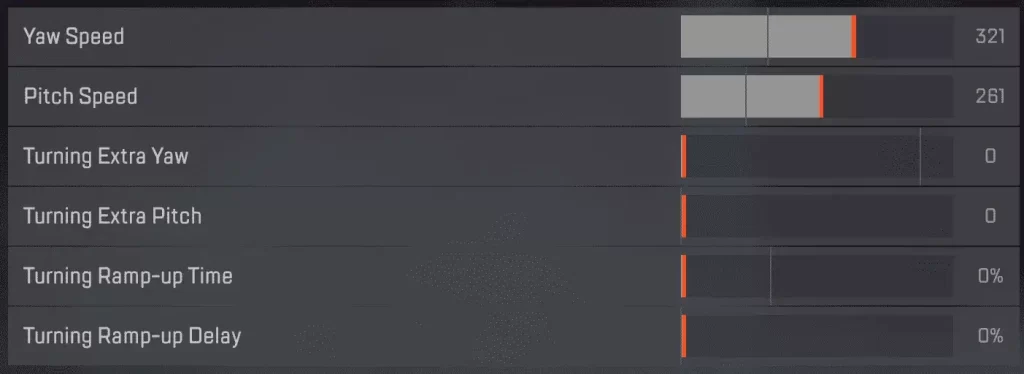
Character Movement
Yaw Speed: 320
Pitch Speed: 260
Extra Yaw: 0
Turning Pitch: 0
Ramp-up Time: 0%
Turning Delay: 0%
Movement Sensitivity
The next batch of ALC settings focuses on your character’s movement sensitivity. Yaw Speed controls the speed at which your character moves left and right, while Pitch Speed dictates the up-and-down movement speed. Generally, it’s advisable to set Pitch Speed lower than Yaw Speed.
Yaw and Pitch Controller Settings
Turning Ramp-up Time and Turning Ramp-up Delay are two additional settings that control how quickly the Extra Yaw and Pitch settings kick in. Turning Ramp-up Time is the duration it takes for Extra Yaw and Pitch to reach their full strength. Most players prefer setting both of these to 0.
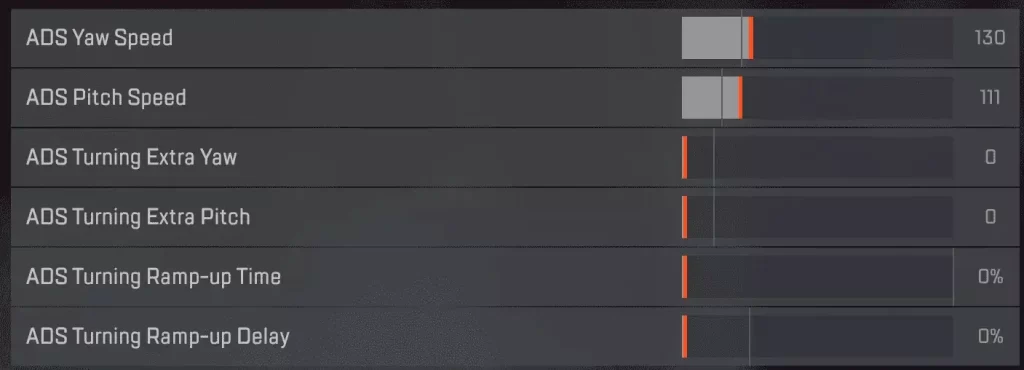
ADS Movement
Yaw Speed: 130
Pitch Speed: 110
Turning Extra Yaw: 0
Extra Pitch: 0
Turning Ramp-up Time: 0%
Ramp-up Delay: 0%
ADS Aim Down Sights Controller Settings
Turning Ramp-up Time and Turning Ramp-up Delay are two additional settings that control how quickly the Extra Yaw and Pitch settings kick in. Turning Ramp-up Time is the duration it takes for Extra Yaw and Pitch to reach their full strength. Most players prefer setting both of these to 0.
Example
If your standard Yaw Speed is set higher for quick horizontal movements, you might want to lower the ADS Yaw Speed for more accurate tracking of targets. Similarly, if you’ve set a specific Turning Extra Yaw in the standard settings for snappy movements, you might want to reduce it.

Target Compensation
Target Compensation: On
Melee Target Compensation: On
Target Compensation and Melee Compensation Settings
Target Compensation and Melee Target Compensation settings serve as your aim assist features in Apex Legends. It’s highly recommended to keep these settings enabled, as turning them off could put you at a significant disadvantage when it comes to tracking and engaging with enemies.
Important
These are just recommendations. The best settings are the ones that feel the most comfortable for you and enhance your gameplay experience. Feel free to experiment to find your optimal settings.